Pages

Saturday 27 April 2013

For Lucy

Yesterday was my friend's birthday (the one who I make knitted dogs for!). I therefore decided to whip her up a little present, so after having an idea, went looking through my fabric stash to see what I could find. I'd decided to make a little hanging cushion with her name on, so just needed some relatively small pieces of fabric for each of the letters and a slightly larger piece for the back of the cushion.

I firstly looked for a larger sized piece of fabric, and found some left over from cutting up the bolster cushions for my sister's present (see here). I figured this would make a good-sized base and set about working out the layout of the name. To do this, I simply drew onto this piece of fabric with a pencil, intending to use this fabric as a base to appliqué on the letters. 


After doing this, I transferred the letters onto a piece of paper, and cut out each of the letters to give myself a template for cutting them out of their patterned fabrics. 


Each letter was then pinned onto the wrong side of each of the patterned fabrics I had picked, back to front, and then cut out so that they could be appliquéd onto the base fabric. 


Once cut out, each letter was pinned onto the base fabric, individually, and then I sewed around each using a zig-zag stitch on my sewing machine, until all four of the letters were sewn on.


The next stage was to actually make this into a hanging cushion, so I got out a second larger piece of fabric for the back of the cushion, and found some ribbon to hang it on. I trimmed around the letters to make a better shaped piece to work with, and cut the backing fabric to the same size, making sure to leave seam allowance. I then pinned the ribbon to the top of the 'L' and the 'y' to sew that into the seam, and then got sewing, leaving a gap at the bottom to turn my work through.


At this stage, I opened up the fabric behind the 'L' and the 'y' to stuff them individually with stuffing, making those letters more 3D, before turning the cushion cover through to the right side.


After turning the cushion cover through, I stuffed it, and hand stitched the bottom opening closed to have one finished cushion!


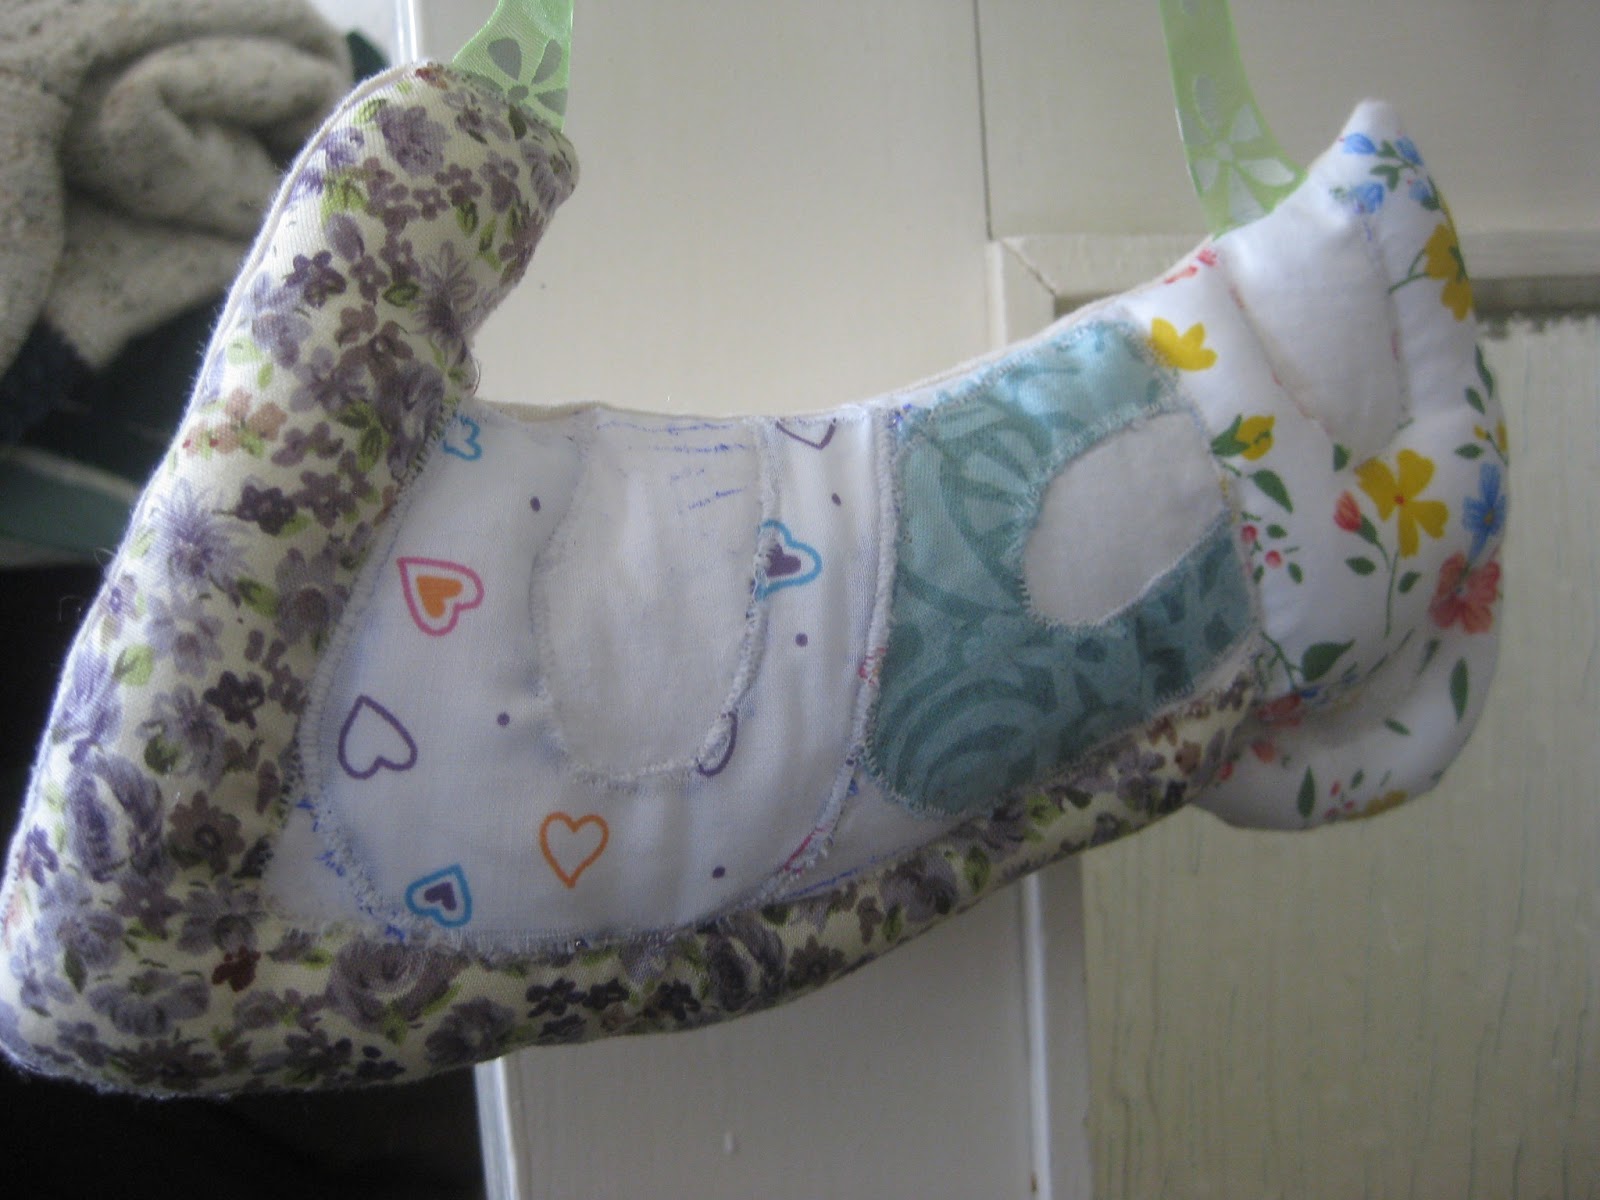
And there you have it, one personalised little hanging cushion - Happy Birthday Lucy!
       

Sunday 21 April 2013

When siblings grow up

Today is a very special day for my sister - her 18th birthday! Obviously such an important birthday required a gift of some description, so after some deliberation my wife and I decided on making a big 'E' cushion, as that is her first initial. 

The first stage in actually making this vision a reality was buying a couple of bolster cushions, which we ended up getting from Dunelm Mill, and selecting some fabric. We'd decided that we wanted to make the faces and the sides of the cushion different fabrics, and decided to use some of the blue and white spotty fabric for the main fabric. There was therefore a trip to Hobbycraft to be had, and we ended up going on an excellent day - the cotton fabrics had all been reduced to £3 a metre, so we snapped up plenty of an amazing robot and alien fabric.

The next stage was working out a pattern, which I did based on using one whole bolster cushion for the left edge of the 'E' and cutting up the second one for the arms. I therefore measured out and created a paper 'E' shape.
Then it was time to make the 'E' cushion pad out of the two bolster cushions.

And then to cut out the fabric pieces that would make up the cushion cover.
Unfortunately, after cutting out all the fabric pieces, I realised that I'd made an error in the size of the 'E' piece. I'd made the gaps between the arms too large, so the first stage of the sewing up the cushion cover was to make the front and back pieces the correct size.

Next was to attach all the side pieces of the cushion cover, firstly to the front 'E' piece. 

And then attaching the second 'E' piece to those side sections. 

It was then time to put in the zip down the long edge on the left of the 'E' and to sew up each of the corner seams of the arms. 

So there you have it, one finished giant 'E' shaped cushion for one very special sister. She hasn't actually yet seen it as we have not travelled home since it has been finished, but I did send her a swatch of the robot and alien fabric which she loved! We'll be giving it to her next time we're back in Kent, and I'm hoping she'll love it.
       

Saturday 13 April 2013

One whippet

Another one of the projects I mentioned here that I've now finished is the knitted whippet. I actually started this project back at the beginning of March, before I started (and completed) my World Book Day costume. 

The knitting up of this little dog wasn't all too tricky, and when I actually got back to it, it didn't take all too long to finish. To make sure the dog's legs were as sturdy as possible I followed the recommendation in 'Best In Show: Knit Your Own Dog' to use pipe cleaners. This is because the legs are so narrow that the extra support is needed. 

All in all, I'm pretty pleased with the way this whippet turned out, and very much enjoyed that it is only one colour, as this eliminated the need for colour changes.


So there you have him, one more of the dogs from this book that I've knitted up, bringing the grand total to three so far, with one more to do sometime before the summer!
       

Wednesday 3 April 2013

Begining to put my hexagons together

Once all the fabric for my hexagons had been cut and attached to their paper counterparts (see here), it was time to set about joining them all together! 

When I started to do this, I hadn't really entirely decided upon the final design of my quilt, which obviously wasn't ideal but I was too impatient to get going. I did know that I wanted to join the different fabrics in a random way so started by putting all my hexagons into a bag so I could jumble them up and pick one at.

I began by simply piecing my hexagons together in any old order, not really paying attention to the shape it was becoming, but trying to attach as many together using the same length of thread. For this joining process I'm simply using plain white thread that I bought at Hobbycraft, and have 1000m of. I'm also using a 'between' needle, as I remember reading somewhere that these are one of the best types to use for hand quilting. 

As I got going a bit, I decided that it would be easier for me if I attached my hexagons in a hexagonal shape, so I set about joining them together to achieve this. 

As for how I've been attaching the hexagons together, I have been using a whip stitch over the edges of two hexagons, placed right sides together, like so:


I've found this method to work well for me, and goes relatively quickly. I've simply been making sure to make the stitches at the ends of the hexagons really tight and small to ensure there are no gaps when it's all turned out the right way.

Here is the progress of the quilt top, so far (which is about five days into starting the joining)


And a shot of the back too:


I have also decided that as I join the hexagons I'm going to take out the papers from the middle hexagons. I figured this would help make the fabric easier to work with as the paper obviously holds it stiff. 


I have therefore taken out all the middle papers, leaving only the hexagons around the outer edge with their papers intact, and here is what my quilt top looks like so far:


You can see the tacking stitches in the outer row of hexagons, where the paper is still being held, and these will be taken out when the next row of the large hexagon has been completed.

Through doing this process, I've decided that I want to keep this section of the quilt as a hexagon, rather than squaring it off as was my original plan. My plan, therefore, is to continue joining the hexagons together in this manner until I run out!