Pages

Showing posts with label Hobbycraft. Show all posts

Sunday, 21 April 2013

When siblings grow up

Today is a very special day for my sister - her 18th birthday! Obviously such an important birthday required a gift of some description, so after some deliberation my wife and I decided on making a big 'E' cushion, as that is her first initial. 

The first stage in actually making this vision a reality was buying a couple of bolster cushions, which we ended up getting from Dunelm Mill, and selecting some fabric. We'd decided that we wanted to make the faces and the sides of the cushion different fabrics, and decided to use some of the blue and white spotty fabric for the main fabric. There was therefore a trip to Hobbycraft to be had, and we ended up going on an excellent day - the cotton fabrics had all been reduced to £3 a metre, so we snapped up plenty of an amazing robot and alien fabric.

The next stage was working out a pattern, which I did based on using one whole bolster cushion for the left edge of the 'E' and cutting up the second one for the arms. I therefore measured out and created a paper 'E' shape.
Then it was time to make the 'E' cushion pad out of the two bolster cushions.

And then to cut out the fabric pieces that would make up the cushion cover.
Unfortunately, after cutting out all the fabric pieces, I realised that I'd made an error in the size of the 'E' piece. I'd made the gaps between the arms too large, so the first stage of the sewing up the cushion cover was to make the front and back pieces the correct size.

Next was to attach all the side pieces of the cushion cover, firstly to the front 'E' piece. 

And then attaching the second 'E' piece to those side sections. 

It was then time to put in the zip down the long edge on the left of the 'E' and to sew up each of the corner seams of the arms. 

So there you have it, one finished giant 'E' shaped cushion for one very special sister. She hasn't actually yet seen it as we have not travelled home since it has been finished, but I did send her a swatch of the robot and alien fabric which she loved! We'll be giving it to her next time we're back in Kent, and I'm hoping she'll love it.
       

Wednesday, 3 April 2013

Begining to put my hexagons together

Once all the fabric for my hexagons had been cut and attached to their paper counterparts (see here), it was time to set about joining them all together! 

When I started to do this, I hadn't really entirely decided upon the final design of my quilt, which obviously wasn't ideal but I was too impatient to get going. I did know that I wanted to join the different fabrics in a random way so started by putting all my hexagons into a bag so I could jumble them up and pick one at.

I began by simply piecing my hexagons together in any old order, not really paying attention to the shape it was becoming, but trying to attach as many together using the same length of thread. For this joining process I'm simply using plain white thread that I bought at Hobbycraft, and have 1000m of. I'm also using a 'between' needle, as I remember reading somewhere that these are one of the best types to use for hand quilting. 

As I got going a bit, I decided that it would be easier for me if I attached my hexagons in a hexagonal shape, so I set about joining them together to achieve this. 

As for how I've been attaching the hexagons together, I have been using a whip stitch over the edges of two hexagons, placed right sides together, like so:


I've found this method to work well for me, and goes relatively quickly. I've simply been making sure to make the stitches at the ends of the hexagons really tight and small to ensure there are no gaps when it's all turned out the right way.

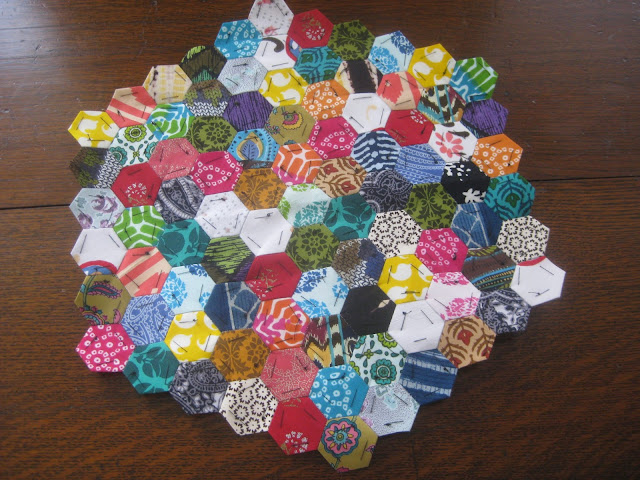
Here is the progress of the quilt top, so far (which is about five days into starting the joining)


And a shot of the back too:


I have also decided that as I join the hexagons I'm going to take out the papers from the middle hexagons. I figured this would help make the fabric easier to work with as the paper obviously holds it stiff. 


I have therefore taken out all the middle papers, leaving only the hexagons around the outer edge with their papers intact, and here is what my quilt top looks like so far:


You can see the tacking stitches in the outer row of hexagons, where the paper is still being held, and these will be taken out when the next row of the large hexagon has been completed.

Through doing this process, I've decided that I want to keep this section of the quilt as a hexagon, rather than squaring it off as was my original plan. My plan, therefore, is to continue joining the hexagons together in this manner until I run out!
       

Tuesday, 5 February 2013

Why not dye?

While we were at my Mother's for Christmas, she offered me the two sets of bedlinen that used to be mine when I still lived at home. Seeing as they're still in relatively good condition and we enjoy free things, we said yes and brought them both back to Oxford. The only thing we disliked about the two sets was that they're the same. 

Therefore, when my wife suggested that we dye one set, I got all excited and we popped to Hobbycraft at the weekend. We had already looked at the different colours we could buy and decided we wanted the Tulip Red Dylon machine dye. Thankfully they had that specific colour and we snapped up a pack for £6.49. We then also bought the 500g pack of salt for £1.
Upon getting home, we brought out the duvet cover and four pillowcases:
Following the instructions on the packet, we put the linen in for a quick wash so it was damp,
poured the dye mix into the drum, covered it with the salt and added the linen back into the machine. We then did a 40° cycle, added a liquitab when it was finished and reran the 40° cycle until the dyeing stage was finally finished!
We still had to run another 40° cycle with another liquitab to try to clean out the machine. We don't want all our clothes being dyed, and hung out the bedlinen to dry.

Because we didn't use any pre-dye, the colour wasn't as red as it would probably otherwise have been, but we'd decided we wanted to try to make a deeper red and hence left the linen as it was to begin with.

Anyways, here's the finished result (please excuse the terrible lighting, but it was dark)
And for comparisons sake, here's the other set to show the colour difference:
Although the colour didn't come out quite as we expected, we're still happy with it and glad we decided to dye the set. 
       

Saturday, 12 January 2013

Home shadowboxes

For a while now I've liked the look of projects like this one on Pinterest, and thought that I'd use this idea, combined with pictures of places my wife and I have lived to make some shadowboxes. 

So, during December we took a trip to Hobbycraft to pick up some supplies. We managed to get two white shadowboxes and some wooden numbers, as we already have a fair supply of crafty bits for projects like this one. We also decided that we'd use photos of the property and add in scrapbooking items like tickets or receipts from memorable events in our life from when we lived in that place. 

Here is a shot of halfway through the process of making one of the shadowboxes:
We simply used the piece of paper in the frame to stick our memorabilia items on, making use of almost anything we found in our memory boxes. The photo above shows the shadowbox for our apartment in Grenoble, and uses things like train tickets, our supermarket loyalty card and a take-away menu. We positioned these items around the edges of the paper, leaving enough room to put in a 6"x4" photo of the apartment in the middle. Then we placed wooden numbers and letters in the foreground of the shadowbox by sandwiching them between the glass and the wooden frame that holds the whole box together. I didn't feel the need to secure them any more than this as it seemed to work! Finally, I simply added the road name to the top of the photo using a Sharpie. 

And the final product looked like this:
Then the process was simply repeated for our home back in Kent, using the supplies we could find, including our key.
So there we have two shadowboxes, documenting the places we've lived and reminding us of some of the things that happened while we lived there. We intend to create one of these for each property we live in, and have already made a mental list of items we might like to include when we move out of our current apartment!