Pages

Friday, 25 May 2012

Laying out the Birthday Blanket

I set myself a target to complete the Birthday Blanket during our time here in Grenoble, and in this post I had only thirty-nine days to finish the knitting of 46 more squares! I'd like to announce that I've managed this; all 121 squares for the blanket are finished, hooray!

This is them, all of them:
You'll notice in this picture that the cream coloured squares aren't yet blocked. 
So, I figured I'd best lay out this blanket just to check that it looked good in its final design still (although I don't really know what I'd have done if it didn't...)

This is the blanket in the configuration that I drew out on paper
But, as I'd already suspected, the top left quarter was looking a little dark with the brown and purple squares. I therefore swapped out the purple ring from that quarter for the red ring in the bottom right corner, and we had this ...
More balanced, don't you think?

Now I just need to sew all 121 squares together ... not sure that'll get done before we go back to England, but at least all the knitting is done! (...other than the border which will be done at some point, but shhh)
       

Thursday, 24 May 2012

From Little Acorns

Back in the autumn, my wife and I decided that it might be fun to try to grow an oak tree from the hundreds of acorns that were along the sides of the roads here in Grenoble. So we picked some up. At that point we didn't really know the correct way to set them growing, so we looked it up on various websites and ended up putting the acorns we'd collected into a bag of moist compost in the fridge.

They stayed there all winter, and we retrieved the acorns in early March to plant them out. Many of them had already started sprouting so we knew they were ready.

Fast forward to now and we have a whole host of small trees growing. Pretty much each acorn that we put in the compost has started to grow! Each shoot is about 10 cm tall and developing nicely.
We plan to repot the shoots into much bigger pots when we get back to England, as we don't anticipate having anywhere permanent to plant them for a fair while. 
Any advice on how best to care for our growing trees would be greatly appreciated :)
       

Monday, 21 May 2012

A New Recipe Book

Back when I moved to uni my wife gave me a recipe book which had her family recipes in it. This is the recipe book we've used since and added to with a couple of new recipes. However, it's not very big and with an ever-increasing number of magazine cutouts that don't fit in the recipe book, I wanted to make a new one - not that I love our little one any less mind you.

This is where the rest of our purchases from Dalbe (as mentioned here) come in. As I knew that I wanted to make this recipe book I thought being given vouchers for an art shop was the perfect time to get my supplies as otherwise who knows what I'd have come out with!

And this is what I bought ... 


Included in that pile is:
  • 10 sheets of 160 gsm A2 paper in two different colours,
  • one sheet of 1.5 mm foam board, 
  • a 60 cm roll of paper-backed fabric,
  • one 50 x 70 cm piece of decorative paper

I knew that I wanted to construct the recipe book in a traditional manner, using signatures and sewing them together. I used this tutorial as the basis for our recipe book and here's how it went ...

I started out by folding and cutting each of the 10 A2 sheets of paper in half lengthwise. After this I cut 5 cm off the right edge of each sheet to make the pages and the spacers for the book. (I decided to use spacers for this book as a means to attach recipes that are double-sided, and also to make sure the book doesn't get overfilled by sticking in photos and clippings.)
The next step was to fold each of the pages and spacers in half which I did individually, considering the weight of the paper, to try to make sure they were as accurate as possible. As the spacers were pretty small and I therefore found them quite tricky to fold accurately, I first scored each one down the middle using my ruler and a knitting needle. Each page was then pressed along the fold using the back of a metal spoon to make a nice crisp fold. 
I then organised these pages and spacers into signatures using two pages of one colour and two spacers of the other paper colour.
The next step was to punch the holes into each signature to facilitate the sewing. This was done by marking holes 1, 4.5, 8, 11.5, 13.5, 17, 20.5 and 24 cm along the fold of one of the spacers to use as a guide. This guide was then laid on the top of each signature to show where I needed to punch through. I used pegs to hold the pages together while I did this in an effort to make sure the holes remained accurate. 
The signatures were then organised into their final order and the sewing commenced. 
To sew the book together I used some leftover embroidery thread from the 'Un Jour à la Montagne' cross-stitch. 

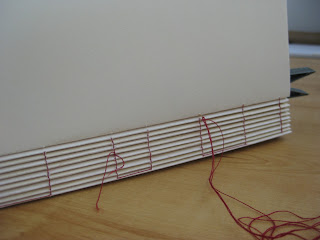
While I was sewing I found it most useful to flip the book between two positions depending on whether I was working on the new signature or the one immediately before it. These were the two positions I made most use of:
After all the signatures were sewn together, I glued over the spine of the book with the only glue I had available and used pegs to hold them in place while they set. 
I then focussed my attention on the cover for the recipe book, measuring out two pieces of foam board 26 x 30.5 cm and one piece 26 x 2 cm. I used masking tape to tape the three pieces together with 3mm between each piece.
The foam board cover then needed to be covered in the paper-backed fabric which I did by glueing the foam board to the fabric, folding over and glueing the corners and then glueing each of the edges, trying to make sure the fabric was taut at all times. 
Then it was time to assemble the book together. 
I taped the bookmark I had made from some more embroidery thread onto the spine of the signatures, and used some more masking tape to help hold that together more securely.
The decorative paper was cut into two pieces 25 x 60 cm and each was folded in half.
The first endpaper was then glued onto the first page of the book before being glued onto the cover to attach the signature into the cover, making sure that there was an even gap around each edge. 
This was then repeated for the back of the book, trying to make sure the signatures sat back against the spine. I then placed the finished book under weight (which happened to be two wine boxes) to hold it all in place while the glue dried.
And there you have our new recipe book, ready for putting all our yummy recipes in.
       

Tuesday, 15 May 2012

Dalbe

On Sunday, during our leaving Grenoble barbecue, I was given a gift voucher for Dalbe by my wife's boss. Dalbe (as I found out) is an art shop here in France and so yesterday evening me and my wife wandered down to our local one to have a look-see. 

This is the bag we came out with:
Most of the contents are for a particular project which I'll get to later (hopefully this week), but I also picked up a magnet kit which I put together this morning.

Following the nice French instructions, I managed to make us a magnet to remember our time here in Grenoble.

I began by cutting out the guide for the design, and taping it to the table so it didn't move. Then the first sticky sheet was laid sticky-side-up on top of that. 
 Then it was time to begin laying out the mosaic tiles
Until all the tiles had been laid and I put the second sticky sheet sticky-side-down on top
The next step was the trickiest as it required me to flip the mosaic upside down and remove the first sticky sheet. Unfortunately the tiles liked that sheet more and were reluctant to come off this first sheet so it took a little while and some repositioning to get the sheet off.
But, it did happen! And then I could stick the mosaic to the magnet, yay
After flipping the magnet back over and pressing down the tiles to make sure they were stuck securely to the magnet, the second sticky sheet came off and our magnet went onto the fridge.
There you go, one Grenobloise-esque magnet :D
       

Friday, 11 May 2012

Turning twenty-two

Today is my twenty-second birthday, and I woke up to a beautifully colourful card and box from my wife.
Inside the little box was a teeny book.
Enclosed in a little pouch in the middle of the book was a gorgeous 16th century Grenoble coin to commemorate our time here.
To give you an idea of size, this coin is about as big as my thumbnail!
The idea is to add this coin to my charm bracelet, which will require us working out exactly how with the help of our lovely jeweller when we're back home. 

Add in messages from family and friends back home in England and the prospect of pizza later on this evening and it's turning out to be a rather good birthday :D

Also appearing to celebrate the day with me is the weather, it being 28°C and looking like this:
       

Wednesday, 9 May 2012

Jour férié!

May in France is amazing - there are four days off work (for those who do work that is! :P)
One of these days was yesterday, meaning that my wife stayed home, yay! We used the day in a very leisurely manner, taking a stroll out to the local shop to buy a few necessary items and then we baked a cake. What's not to like about cake.
We both fancied carrot cake, but rather than buying the ingredients to a particular recipe, we hunted around a bit on the internet to find a recipe that was pretty much what we had already. Then we improvised a smidge too. 
Our starting point was this Delia recipe, but this is how our recipe went:

Ingredients:
200g plain flour
1 large tsp baking powder
175g sugar
1 tsp ground cinnamon
1 tsp lemon syrup
2 eggs
150ml sunflower oil
200g carrots (about 2 medium)
25g desiccated coconut

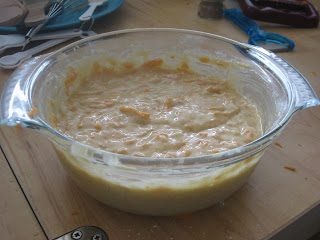
First put the eggs, sugar and oil into a bowl (we used our trusty pyrex as that's all we have that's big enough here in France)
And whisk together
Next add the flour and baking powder and mix again
Then add the remaining ingredients and make sure it's all mixed well
This mix then went into our microwave (seeing as we have no oven in our little apartment) for 6 minutes at 900W.
Take it out when it seems cooked, and leave to cool (this bit took a fair while as our cake was in a glass container)
We then whipped up a quick glacé icing from icing sugar and water to put on the top of the cake
 And ta-da, finished microwave carrot cake.
We decided to keep our cake in the pyrex dish as we have very little crockery here and figured it was best to keep it in there than to turn it out onto one of our two plates!